
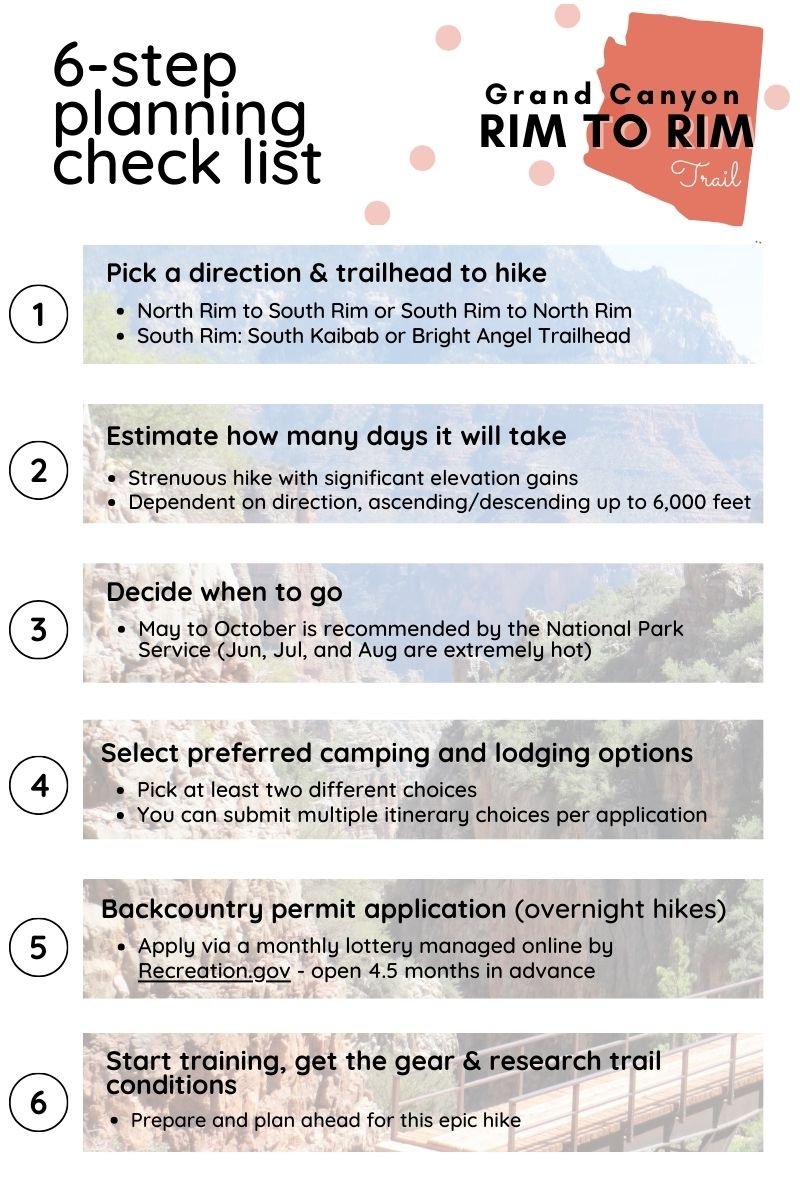
6-step guide to plan your Rim-to-Rim Trail.
In six easy steps, save time planning your Grand Canyon Rim to Rim thru-hike.
NB: 6-step guide is intended as informational only. Hiking in the backcountry is an inherently risky activity with it’s own set of challenges. Please ensure you fully research your trip and remember that safety is each hiker’s responsibility.
Hike the Rim to Rim Trail, a 24 mile point-to point hike in the Grand Canyon National Park.
Hike from the South Rim to North Rim, or vice versa.
A backcountry permit is required to camp overnight, apply online via Recreation.gov (new process put into place in 2024).
Options for sleeping overnight at the park range from lodging, developed campgrounds (vehicles are permitted) and backcountry campgrounds (vehicles are not permitted).

Step 1: Pick a direction to hike
The Rim to Rim Trail can start from the South Rim to the North Rim, or from the North Rim to the South Rim.
There are pros and cons to each direction, however if you are looking for a shorter uphill climb (and more downhill hiking), you may prefer hiking from the North Rim to the South Rim.
In addition to the direction, you will also need to choose which South Rim route to take, as there are two trailheads to choose from.
South Kaibab Trailhead - South Kaibab Trail is 6.8 miles to Bright Angel Campground
Bright Angel Trailhead - Bright Angel Trail is 9.3 miles to the bottom of the canyon
NB: There is only one trailhead from the North Rim:
North Rim Trailhead - North Kaibab Trail is 14.3 miles to the bottom of the canyon
Route 1: South Kaibab Trail.
Considered the more ‘rugged’ trail, this 6.8 mile descent to Bright Angel Campground follows a well maintained trail, with multiple switchbacks for the first 2 miles, leading to a natural ridge line that unravels all the way down to the Colorado River.
Shorter than the Bright Angel Trail, there is limited shade, no water or toilet amenities available on the South Kaibab Trail.
Typically, most hikers take around 4 to 5 hours to reach Bright Angel Campground (on either trail).
Route 2: Bright Angel Trail.
The more popular trail for first timers, the 9.3 mile descent to the bottom of the canyon also follows a well maintained trail. The benefit of this trail is that you will have access to shade, toilets and water on the way down to the canyon.
In addition, you can stop at Havasupai Gardens around the half-way mark - the perfect place for a rest stop.
Elevation:
South Kaibab Trailhead – 7,260 feet
Bright Angel Trailhead - 6,860 feet
Bright Angel Campground – 2,480 feet
North Kaibab Trail.
The most difficult part of the trail due to the extreme changes in elevation, the North Rim is often overlooked with only one in ten visitors venturing outside of the South Rim.
At 1,000 feet higher than the South Rim and covering twice the distance, what it lacks in expansive 360 degree views it makes up for with a variety of ways - from the ecology and waterfalls, to bridges and wildlife.
The North Kaibab Trail will kick your butt, descending steeply into the valley via a series of endless switchbacks. This top portion of the trail (down to Roaring Springs) is the most challenging part of the hike as you descend almost half of the drop in the first 5 miles.
Elevation:
North Rim Trailhead – 8,241 feet
Roaring Springs – 4,800 feet
Colorado River – 2,425 feet
Rim to Rim Trail viewpoints
If you are looking for expansive, jaw dropping 360 degree views - the Rim to Rim Trail will not disappoint.
Both the South Rim and North Rim offer expansive views from a number of viewpoints, including Ooh Aah Point and Coconino Outlook.
Didn’t get a backcountry permit? There’s always next year. If you can’t wait, rest assured there are plenty of shorter day hikes to be enjoyed.
South Rim - National Park Service recommend that you don’t go further than Skeleton Point.
North Rim - National Park Service recommend that you don’t go further than Roaring Springs.
South Rim viewpoints.
-
Just under 1 mile hike from the trailhead (1.8 miles return).
Great hike with a spectacular view if you are short on time.
There is no water or restrooms facilities available.
-
1.5 miles from the trailhead (3 miles return).
Beautiful plateau that over-looks the canyon – great spot for lunch!
-
3 miles from the trailhead (6 miles return), where you can catch your first glimpse of the Colorado River.
The National Park Service advise that you should not travel beyond this lookout on a day hike.

North Rim viewpoints.
-
0.7 miles (1.4 miles return) from the trailhead.
A short hike offering a different perspective of the canyon and a great view of Roaring Springs Canyon.
-
1.7 miles (3.4 miles return) from the trailhead.
A good day hike, experiencing an elevation change of 1,440 feet.
-
5 miles (10 miles return) from the trailhead.
Start early in the morning for an enjoyable and strenuous day hike.
The National Park Service advise that when planning a day hike, it is not recommended to go further than ‘Roaring Springs’ as it is a tough climb to the top due to the extreme elevation changes.

Step 2: Estimate how many days it will take.
As always, hike your own hike and take as long (or as little) time as you need.
The Rim to Rim trail is best hiked over two to three days, due to the significant changes in elevation.
Many people hike the trail in one to two days, however allow yourself (and your joints) enough time to stop, take a picture and fully immerse yourself in your surroundings.
Above all, enjoy this unique opportunity to experience a night under the stars at the bottom of the Grand Canyon!

Step 3: Decide when to go.
According to the National Park Service, you can hike the Rim to Rim Trail from mid-May* to mid-October.
Due to the extreme heat at the bottom of the canyon during peak summer months, it is wise to avoid June, July and August.
Overall, the best time to hike the trail is a small window from mid to end May, as well as mid-September to mid-October.
*North Rim Entrance Station closes every year for winter and is due to re-open on May 15, 2024.
Step 4: Select preferred lodging & camping options.
Attracting millions of visitors every year, only a lucky few get to sleep at the bottom of the canyon!
The final step before filling out the permit is to decide which backcountry campground you want to stay at and for how long.

Image source - NPS website
In the backcountry, there are three campgrounds available - in addition to lodging at Phantom Ranch.
Bright Angel Campground
Cottonwood Campground
Havasupai Gardens (previously known as Indian Garden Campground)
Dormitories and cabins - Phantom Ranch
Step 5: Backcountry permit application
A backcountry permit is required for an overnight hike on the Rim to Rim Trail.
There is a limited number of camping spots at the bottom of the canyon and applications for backcountry permits are now available online via a lottery managed by Recreation.gov.
Permit applications open 4.5 months in advance and permits are in high demand.
New permit application process implemented in 2024:
Backcountry permits now available online at Recreation.gov via a monthly lottery.
Applications open for a 2 week period with the lottery is run on the 2nd of each month.
You can apply no sooner than 4.5 months in advance of your preferred start date.
Due to the popularity of this epic hike, it is highly recommended to apply at the earliest consideration period (e.g. don’t miss the two week window to apply for the permit).
Please note: If you are camping in the developed campgrounds on the North Rim or the South Rim, you don’t need a permit.

Step 6: Start training, get the gear & research trail conditions
The appeal of the Grand Canyon reaches far and wide and the Rim to Rim Trail is a firm favourite on hiking trail lists all over the world.
Whilst this is a stroll in the park - the Grand Canyon National Park (!) - extreme elevation, permit requirements, diverse weather conditions and scarce water availability make this trail one that requires a lot of planning and preparation.
If you have trained properly, have the right hiking gear and researched trail conditions extensively, you will experience one of the most memorable hikes in the world.
Rim To Rim gear essentials
-
Shield yourself in the heat of the day with an ultralight sun umbrella from Six Moon Designs.
6.8 oz in weight, this lightweight umbrella is comfortable to hike with and can be used hands free if you purchase an additional bit of kit for $10.
-
There are many ways to filter water on the trail and it will come down to personal preference.
Popular water filters include:
> LifeSaver Wayfarer -’ The safest hiking water purifier out there’
> Sawyer - Squeeze Water Filtration System by Sawyer
> Katadyn - BeFree Water Filtration System 1L
> Platypus - QuickDraw™ Microfilter System
-
Keep the sun and sweat off your skin with the right gear.
Make sure you have a long sleeve sun shirt and sun hoodie with added UPF protection.
-
The Rim To Rim will test you like no other trail, experiencing 6,000 feet in elevation!
Lightweight trekking poles are a life saver and are a must for this trail.
Black Diamond is a popular brand, winning hikers over with their Alpine Carbon Cork trekking poles.
-
There are many great brands that sell dehydrated meal packs - simply fill up with boiling water and you are good to go.
Choose from Mountain House, Backpacker’s Pantry, AlpineAire Foods and more.
** Shout out to Good To Go meals! I tried a few of their entrées for the first time on the Pacific Crest Trail and they tasted great!

LifeSaver Wayfarer - hiking water purifier

Helpful links - NPS website:
Permit lottery via Recreation.gov
Trail Planner (PDF)

My Rim to Rim Trail.
I hiked the trail a few years ago (South Rim to North Rim) and then a 2nd time when I hiked the Arizona Trail in 2023 (North Rim to South Rim).
For my 1st Rim to Rim hike, I flew into Las Vegas and took a shuttle to the Grand Canyon National Park, camping at Mather Campground.
Day one: Hiked the South Kaibab Trail to the bottom the canyon, camping at Bright Angel Campground.
Day two: Hiked the North Kaibab Trail, camping at the North Rim Campground.

Tips:
> Take plenty of food and high-energy snacks. Once you start hiking, there are no facilities to buy extras (unless you booked in advance at Phantom Ranch).
> Take plenty of water - there is limited water availability in the backcountry and dependent on the location, it may be seasonal only (you will need to be prepared to treat all water).
> The hike is strenuous, due to significant elevation gains - it will take twice as long to hike up as it will take you to hike down. The last five to six miles on the North Kaibab Trail kicked my butt (!) and taught me that you cannot underestimate a hike based on the distance hiked.
> Make sure you take lots of layers - accommodate for diverse weather conditions.